
在服务器上建立MySQL数据库
在服务器上建立MySQL数据库
1. 指令安装MySQL-server
sudo apt update
sudo apt install mysql-server
sudo systemctl status mysql
运行完着三个指令之后,查询MySQL的状态:
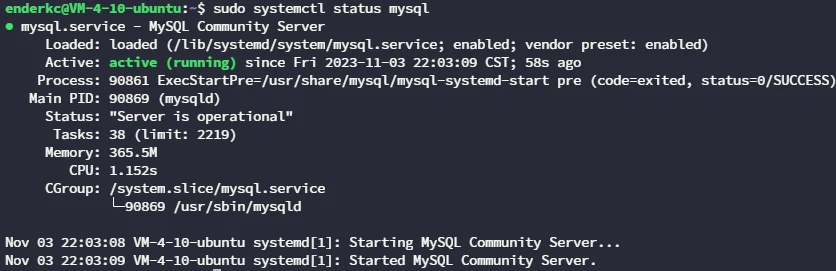
说明您已经成功安装
2. 进入数据库
这是因为在MySQL 8.0上,对root用户使用auth_socket插件进行身份验证。auth_socket插件仅对从localhost连接到Unix socket文件用户进行身份验证。
这意味着您无法通过提供密码来以root用户连接到MySQL服务器。但你可以通过命令sudo mysql连接到MySQL服务器
sudo mysql
出现如下就说明连接成功
Welcome to the MySQL monitor.  Commands end with ; or \g.
Your MySQL connection id is 10
Server version: 8.0.35-0ubuntu0.22.04.1 (Ubuntu)

Copyright (c) 2000, 2023, Oracle and/or its affiliates.

Oracle is a registered trademark of Oracle Corporation and/or its
affiliates. Other names may be trademarks of their respective
owners.

Type 'help;' or '\h' for help. Type '\c' to clear the current input statement.

mysql> ...
3. 创建一个新用户,并且授予权限
- 创建新用户。替换
<username>和<password>分别为要创建的新用户的用户名和密码。请确保选择强密码。
CREATE USER '<username>'@'localhost' IDENTIFIED BY '<password>';
- 授予新用户所有数据库的所有权限。这可以通过以下语句来实现:
GRANT ALL PRIVILEGES ON *.* TO '<username>'@'localhost';
这个语句中的 *.* 表示对所有数据库和所有表的所有权限。如果您只想授予新用户所有数据库的所有权限,而不包括系统表等,可以使用 *.* 或者使用通配符 %:
GRANT ALL PRIVILEGES ON *.* TO '<username>'@'localhost';
- 使更改生效:
FLUSH PRIVILEGES;
这将使上述授权更改立即生效。
- 最后,退出MySQL会话:
EXIT;
现在,您已经成功创建了一个新用户并为他们授予了所有数据库的所有权限。请注意,为了安全起见,不应该随意授予所有数据库的所有权限。只有在必要的情况下,才应该授予这么广泛的权限。
4. 远程访问
当你远程访问你的mysql服务器的时候可能会出现报错
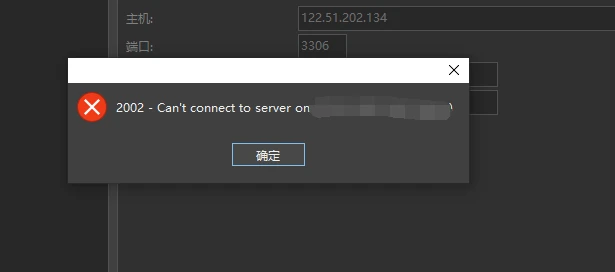
这时候你就要更改一下mysql的配置文件,让所有的服务器都可以访问你的数据库
-
打开这个文件
sudo vim /etc/mysql/mysql.conf.d/mysqld.cnf -
编辑文件,把
127.0.0.1改成0.0.0.0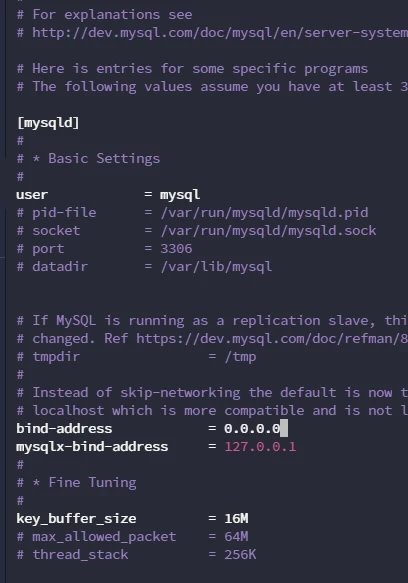
-
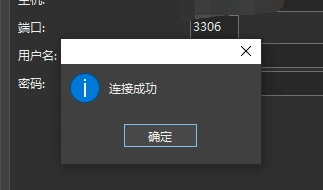
重启mysql服务
sudo systemctl restart mysql sudo systemctl restart mysqld -
现在你可以远程访问了!
-
参考连接:
https://www.myfreax.com/how-to-install-mysql-on-ubuntu-20-04/#google_vignette
本文是原创文章,采用 CC BY-NC-ND 4.0 协议,完整转载请注明来自 EnderKC
阅读建议

评论
匿名评论
隐私政策
你无需删除空行,直接评论以获取最佳展示效果