
当你想装一个网页版的vscode
当你想装一个网页版本的VsCode(附带踩坑攻略)
起因:
学校里面的机房十分陈旧,软件环境已经不能支持平常开发(包括上课)的需要,所以老师要求我们尽量带电脑上课。但是俺的笔记本是游戏本,天天背着,不要提多难受了。
开发环境:
- 服务器供应商:腾讯轻量云
- 服务器环境:Ubuntu 22.04 LTS
- 配置:2C4G (内存占用大概只有300m左右,开大项目除外)
1. 如果想在国内的服务器上运行
先说结论:
如果没有备案的话,最好不要在国内的服务器上部署code-server服务,因为vscode的有些插件需要https连接,国内没有备案的话,https会很麻烦。
原因:
你可能问:有没有可能我用CDN代理或者国外的服务器代理来绕过国内的备案检测
第一种情况:用CDN。国内的CDN大部分还是要你备案的,如果你用国外的免备案的CDN大概率也是不能用的,CDN代理后,你打开网站还会提示【请备案】
第二种情况:用国外的服务器进行nginx反代理来访问国内的服务器(有什么意义?国内的服务器价格来说相对便宜 腾讯云 阿里云)。答案也是不行的,因为code-server需要用到nginx反向代理的Host参数
Host参数是什么?server { listen 80; listen [::]:80; server_name mydomain.com; location / { proxy_pass http://localhost:8080/; proxy_set_header Host $http_host; proxy_set_header Upgrade $http_upgrade; proxy_set_header Connection upgrade; proxy_set_header Accept-Encoding gzip; } }
proxy_set_header Host $http_host;是一个用于Nginx配置的指令,它用于设置代理请求中的 HTTP 头信息。具体来说,它将客户端发送的Host头信息传递给后端服务器。在您的配置中,这行指令的作用是将客户端发送的
Host头信息的值设置为代理请求中的Host头。这是非常重要的,因为在代理请求时,Nginx充当了中间人,将请求从客户端转发到后端服务器。HTTP 1.1 协议规范要求在请求头中包括
Host头信息,以指示请求的目标主机。这对于虚拟主机(Virtual Host)和多个域名共享同一个IP地址的情况非常重要。通过将客户端发送的Host头信息传递给后端服务器,后端服务器可以正确地识别请求的目标域名,这样就可以处理多个不同的域名。总之,
proxy_set_header Host $http_host;是为了确保代理请求中包含正确的Host头信息,以便后端服务器能够根据请求的目标域名来处理请求。这对于正确代理虚拟主机或多个域名的请求非常重要。
也就是说,如果用境外服务器来反向代理国内的服务器,不能带有Host参数(不然也会跳出来备案提示),但是code-server要求必须要带有Host参数,所以这个方法并不是最优解
2. 如果在国外的服务器上运行
同样先说结论:
首先说说最重要的延迟,我用的服务器是腾讯云的轻量云服务器,在本地ping的延迟大概在250ms左右(只高不低),但是写起代码来的延迟却还好,起码可以接受,只有在跳转到定义的时候才能感觉到一点延迟。
而且安装的方式也方便了很多,国内的服务器大概率连不上GitHub还有DockerHub的,所以得自己从GitHub上下载.deb来自己安装(前提是用用的Ubuntu或者Debian,要不然只能用二进制文件了)
缺点:
- 传递文件的速度慢,大文件尽量不要通过SFTP来传输,git会好一点
3. 安装code-server
说了这么多,我们终于要来安装一下了。
这里放上code-server的文档(本文截至2023-10-06官网有些界面还是打不开,阅读体验一团糟)
官网、文档: 👉 戳我
如果你跟我一样用的是Ubuntu的话(别的Linux也行),我们可以使用官方提供的sh脚本文件来安装。
这里放上官网的安装教程:
install.sh
The easiest way to install code-server is to use our install script for Linux, macOS and FreeBSD. The install script attempts to use the system package manager if possible.
You can preview what occurs during the install process:
curl -fsSL https://code-server.dev/install.sh | sh -s -- --dry-runTo install, run:
curl -fsSL https://code-server.dev/install.sh | shYou can modify the installation process by including one or more of the following flags:
--dry-run: echo the commands for the install process without running them.--method: choose the installation method.
--method=detect: detect the package manager but fallback to--method=standalone.--method=standalone: install a standalone release archive into~/.local.--prefix=/usr/local: install a standalone release archive system-wide.--version=X.X.X: install versionX.X.Xinstead of latest version.--help: see usage docs.--edge: install the latest edge version (i.e. pre-release)When done, the install script prints out instructions for running and starting code-server.
If you're concerned about the install script's use of
curl | shand the security implications, please see this blog post by sandstorm.io.If you prefer to install code-server manually, despite the detection references and
--dry-runfeature, then continue on for information on how to do this. Theinstall.shscript runs the exact same commands presented in the rest of this document.Detection reference
- For Debian and Ubuntu, code-server will install the latest deb package.
- For Fedora, CentOS, RHEL and openSUSE, code-server will install the latest RPM package.
- For Arch Linux, code-server will install the AUR package.
- For any unrecognized Linux operating system, code-server will install the latest standalone release into
~/.local.
- Ensure that you add
~/.local/binto your$PATHto run code-server.- For macOS, code-server will install the Homebrew package (if you don't have Homebrew installed, code-server will install the latest standalone release into
~/.local).
- Ensure that you add
~/.local/binto your$PATHto run code-server.- For FreeBSD, code-server will install the npm package with
npm- If you're installing code-server onto architecture with no releases, code-server will install the npm package with
npm
- We currently offer releases for amd64 and arm64.
- The npm package builds the native modules on post-install.
-
总而言之就是在终端运行安装脚本(国内服务器大概率超时)
curl -fsSL https://code-server.dev/install.sh | sh -
设置开机自启动
sudo systemctl enable --now code-server@$USER -
服务默认运行于8080端口,如果要自定义配置,建议去修改以下路径
~/.config/code-server/config.yaml -
修改配置文件
bind-addr: 127.0.0.1:8081 # 允许访问的ip和端口 auth: password # 使用password验证 password: QWEqwe123 # 登录code-server时所用到的密码 cert: false # code-server自带的https加密(不建议使用) -
常用命令
# 设置开机自启动
systemctl enable --now code-server@$USER
# 关闭开机启动
systemctl disable code-server@$USER
# 启动服务
systemctl start code-server@$USER
# 停止服务
systemctl stop code-server@$USER
# 重启服务
systemctl restart code-server@$USER
# 查看服务状态
systemctl status code-server@$USER
4. 配置NGINX和SSL证书
5. 安装插件和使用code-server
其实没有必要写这一节的,但是我遇到的坑实在是太多了。。。
这里以Python环境为例子,首先如果你要下载Vscode插件推荐去微软官方👉点我
我们这里以python为例子:

点击这里下载扩展的离线包,然后通过VSX安装:
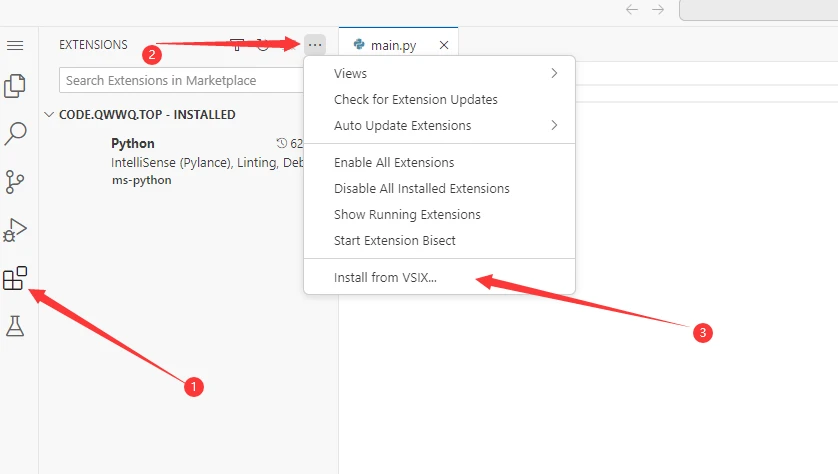
你可以把扩展上传到服务器上面安装(推荐√)
也可以直接选择本地打开文件安装(这种安装方式比较慢)
下面,我来演示Python环境的配置(注意!Vscode插件有的会冲突,可能会造成vscode桌面版不会遇到的奇怪问题,不要问我是怎么知道的)
5. 1. 安装python插件
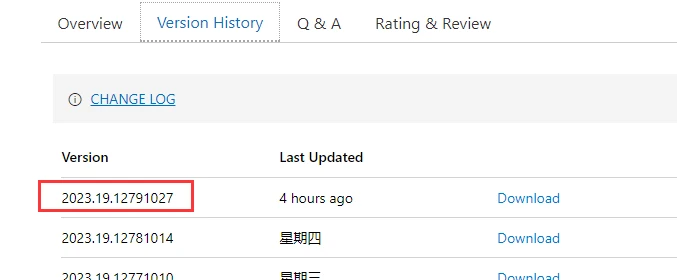
第一步就是像上面那样安装python插件,不过请注意,从官方的微软商店下载的离线包可能和open-vxs上的版本有不同,尽量使用微软官方的。
比如,我们这里下载到的版本是2023.19.12791027
但是在Code-server的插件商店中,目前的版本是
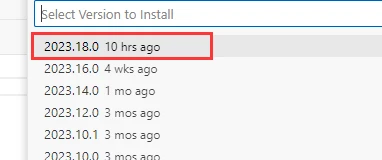
经测验,安装2023.18.0这个版本会导致python代码不能提示等问题
5.2 安装Pylance
从微软下载最新版即可,经测试,可以正常提示代码
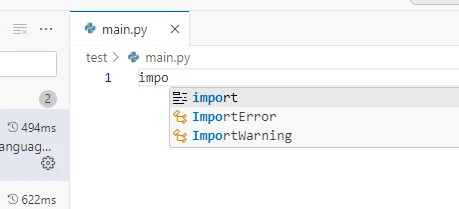
接下来你就可以正常的使用了!